

BetterPress cardstock does more than produce awesome letterpress images! It blends and embosses beautifully too!
I'm finding myself making more and more get-well cards. And, when I do I am usually at a loss for what to do – especially if the card is for a guy. The BetterPress cardstock and system to the rescue!
Letterpress printing provides a formal, elegant feel that is perfect for a masculine card. But then you are faced with deciding what to use for a focal point and or background for it. I decide to make the beautiful sentiment my focal point. And then, I thought it would be fun to experiment with blending and embossing with the cardstock.
BetterPress Cardstock Blending
It was love at first sight with BetterPress cardstock for me. I love everything about it! But, it only comes in two colors right now: porcelain (white) and bisque (cream). That is why we're doing some blending for this card.
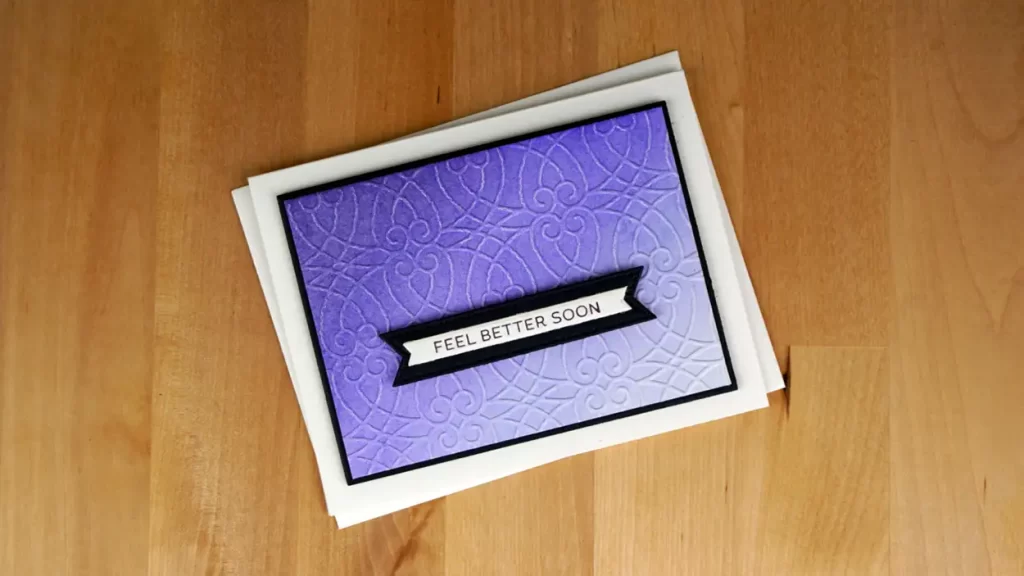
We'll start with an A2 size panel (4 1/4″ x 5 1/2″) of this wonderfully thick (118lb) cotton cardstock. And, blue is the perfect color to convey the sentiment. So, we'll use four shades of blue to create an ombre effect diagonally across the panel. I decide to use what I consider to be some of my best ink, Altenew Fresh Ink, and brushes for blending, Altenew Large Blending Brush.
First, we'll load our brush with the lightest blue ink, tap it off on a paper towel, and then blend the ink onto the lower right-hand corner. I like to begin with a light hand and then layer on the color. Next, we'll add the second lightest blue and we'll start by blending it into the lighter blue. And then, we'll work all the way up to just beyond the diagonal line from the lower left to upper right corners.
Following that, we'll go with the next blue tone blending it into the color before it and taking it halfway to the top left corner. And, using the same technique we'll blend the darkest blue in the corner.
Now, we'll blend back over our blending in the reverse order. And we want to make sure to clean our brush by rubbing the ink off on our paper towel between each of the colors. This second layer of blending smooths the blending into a seamless transition from one color to the next.
BetterPress Cardstock Embossing
OK, with the blending done, now we'll emboss the panel with a formal design that is appropriate for the sentiment. To do so, we'll spritz the back of our blended panel so that the water doesn't react with our blending. And then, we'll place it into the embossing folder and run it through our die-cutting and embossing machine.
BetterPress Letterpress
While we have our die-cutting and embossing machine out, we'll go ahead and create our BetterPress sentiment. We'll start by adding another A2 panel of BetterPress cardstock to the platen from the BetterPress Letterpress System with craft tape.
And then, we'll place our sentiment plate on the carrier (from the BetterPress Letterpress System). Once, it's all set up then we'll place the paten onto the carrier and let the magnets fasten them together perfectly. And then, we'll run the whole thing through our die-cutting and embossing machine.
Following that, we'll die-cut the sentiment strips with the coordinating die that comes with the set. And, while we have our die-cutting machine out we'll also die-cut a stitched banner and, a 3 5/8″ x 4 7/8″ accent color panel from deep blue cardstock.
Assembly
Assembling the card is quick and easy. We'll begin by trimming our embossed panel down to 3 1/2″ x 4 3/4″. And, we'll fasten it to the color accent with a tape runner. Next, we'll trim a piece of double-sided adhesive foam sheet to 3 1/2″ x 4 3/4″ and attach it to the back of the color panel. And then, we'll remove the backing paper and spread some liquid glue over the tacky foam sheet back. We do so, to give us a little wiggle room when placing the panel on the card base.
HINT: I find it works best to use your finger to spread the glue over the entire back of the foam sheet.
Now, we'll attach the card panel combination to the card base and set a weight on it (a larger acrylic block works perfectly for this).
Next, we'll fasten the sentiment to the color panel with liquid glue, and then we'll pop it up on the card front with foam tape.
And that's it. We pulled off a beautiful, elegant Feel Better card that could be sent to anyone.
BetterPress Cardstock Review
You already know that I absolutely love the BetterPress Letterpress System. But, if you missed them, I created this video while using it for the first time:
And, wrote How To Make A Birthday Card Using Betterpress too. But, I want to give you my review of the cardstock as well. The BetterPress cardstock is 118 lb cotton so blending on it is different than blending on smooth cardstock. For a lack of a better way to explain how it's different I'd say it's a bit “grainer”. That is probably because the cotton fibers hold on to the ink differently.
But that said, the cardstock blends like a dream.
And then, there is the embossing. For me, this is a game changer just like the letterpress is. The embossed images are crisp and think and create such beautiful dimension!
Therefore, for me the cardstock is now a staple in my craft room along with the BetterPress system. The combination elevates your work to a whole new level.
Supplies
The following list may contain affiliate links. If you purchase something by following a link on this page, I may receive a small commission at no extra cost to you. Thank you for supporting my blog.
- Cardstock: Card Base – Neenah Classic Crest 110lb Solar White, Card Panel – BetterPress Porcelain 8 1/2 x 11 or BetterPress Porcelain A2 Panels; Color Accent – Taylored Expressions Blue Corn
- Plate: Spellbinders BetterPress Always & Forever Sentiment Strips Plates & Dies
- Dies: Gina K Designs Master Layouts 2
- Ink: BetterPress – Spellbinders BetterPress Ink Mulberry; Dye Ink – Altenew Fresh Dye Ink – Blue Mountains Set – Water Hyacinth, Alpine Aster, Crystal Violet, Indigo Skies
- Blending Brush: Altenew Large Blending Brush
- Embossing Folder: Spellbinders Styalized Trellis
- Die-cutting and Embossing Machine: New and improved Spellbinders Platinum 6 Extended
- Letterpress Machine: Spellbinders BetterPress Letterpress System
- Paper Trimmer: Tim Holtz Rotary Media Trimmer
- Adhesives: Craft tape – Spellbinders Best Ever Craft Tape; Tape Runner: Spellbinders Tape Runner; Foam Sheet – Scrapbook.com Double-sided Adhesive Foam Sheet; Liquid Glue – Gina K Connect; 1/4″ Foam tape – Scrapbook.com 1/4″ Double-sided Adhesive Foam Tape
- Reverse Tweezers – Spellbinders Reverse Tweezers