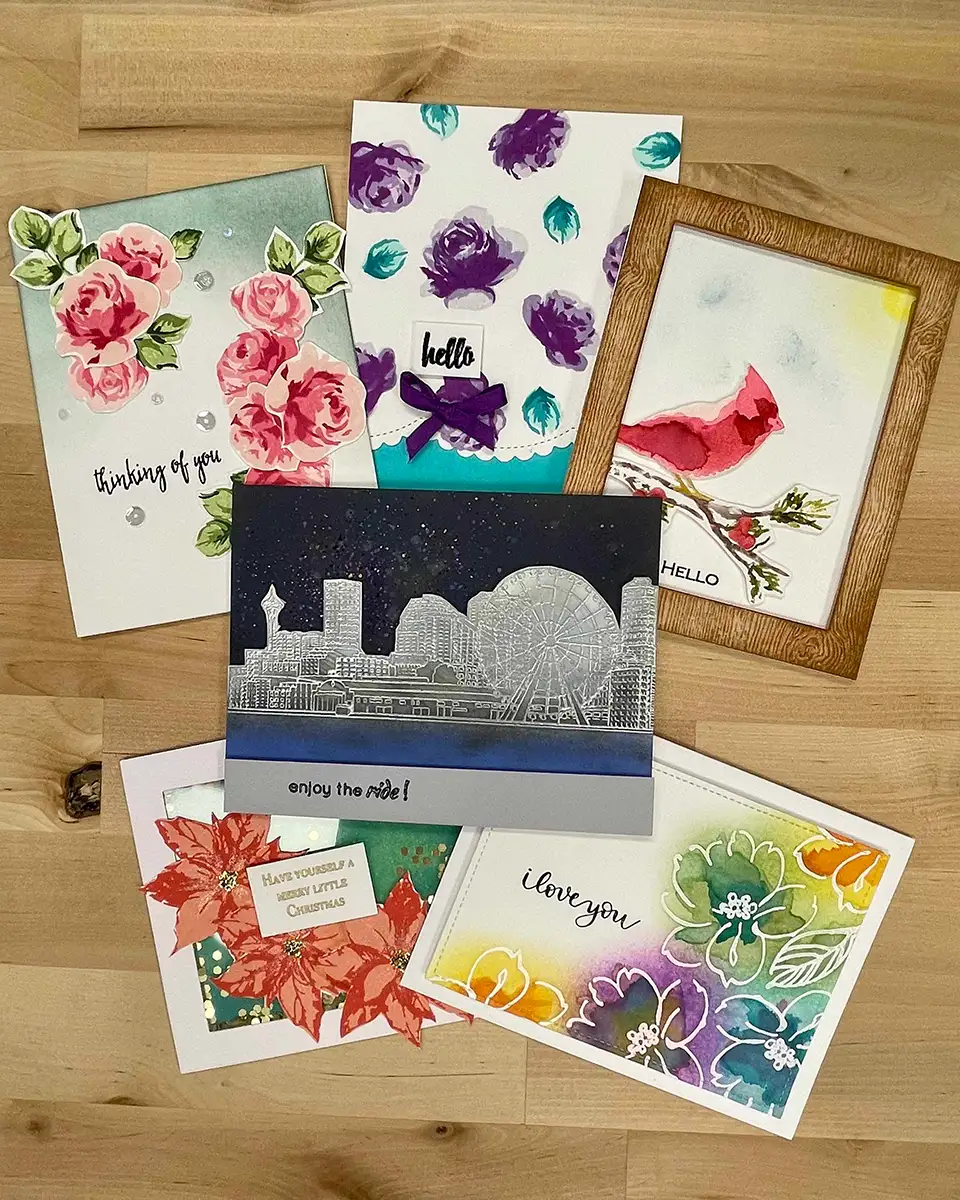
Wow, them with your handmade cards using different and unique ink blending techniques! Read to the end to learn how to make 5 cards.
I am learning so many cool techniques while taking classes as part of the Altenew Educator Certification Program. In this post, I'll be sharing the cards that I made while taking the Easy Ink Blending Techniques class.
Basic Ink Blending Techniques

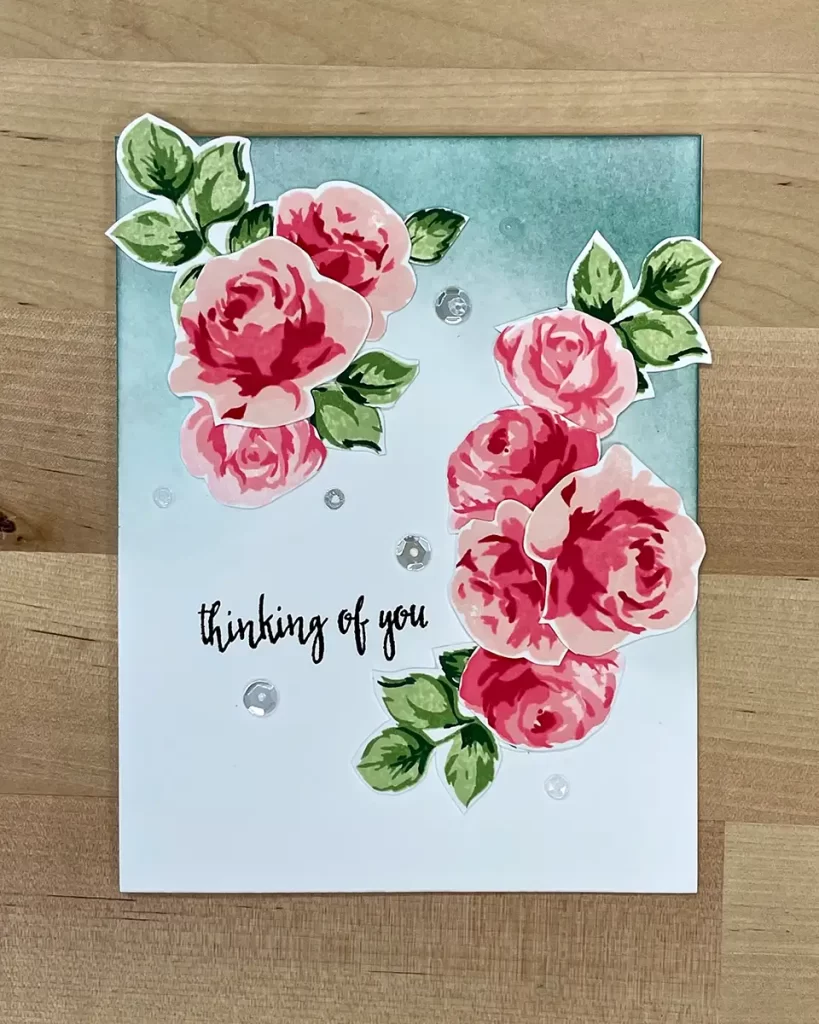
This card, reminiscent of Victorian cards, uses simple blending to provide a beautiful backdrop for the floral images. To make it I just lightly blend in around the top of an A2-size card base.
The next step is to stamp each of the layered images. I chang up the colors of the layers for a couple of the images to create additional interest. I then cut out all of the images using the coordinating die set.
The roses and leaves are then arranged to create a beautiful frame for the stamped sentiment.
Lastly, I add a few sequins for some sparkle.
Supplies:
The following list may contain affiliate links. If you purchase something by following a link on this page, I may receive a small commission at no extra cost to you. Thank you for supporting my blog.
Cardstock: Neenah Classic Crest 110lb Solar White: Neenah Classic Crest 80lb Solar White
Stamp: Altenew Vintage Roses, Altenew Thinking of you
Ink: Altenew pigment ink – Obsidian; Altnew Crisp Dye Ink – Blush, Frosty Pink, Coral Berry, Ruby Red, Cotton Candy, Frayed Leaf, Forest Glades, Evergreen, Moon Rock; Prism Shimmer Ink Thundercloud, Ocean Spray
Embellishments: Taylored Expressions Snow Flurries Sequins
Adhesive: Bearly Art Glue, Gina K Connect; Gina K Designs Adhesive Dot Runner
Ink Blended Cardstock

Ever wish that you had cardstock to match the ink that you've using to stamp with? You can by ink blending with the same color ink on white piece cardstock: just blend evenly.
To create a card with blended cardstock I stamp these pretty layered roses onto a white card base and then add the leaves in a coordinating color. To add interest I add scalloped swags using a die-cut … but it still needed a punch of color to pull it all together.
I use the same color that I use for the second layer of the leaves and blend it onto another card panel, making sure to be really careful to evenly blend the color. Hint: it takes a little bit of time for the ink to soak into the cardstock so you have to be patient for it to smooth out. It was worth the wait! Look at that bright vivid accent that really finishes the card. then I add the sentiment and a little matching bow and we have a pretty little card.
Supplies:
The following list may contain affiliate links. If you purchase something by following a link on this page, I may receive a small commission at no extra cost to you. Thank you for supporting my blog.
Cardstock: Neenah Classic Crest 110lb Solar White: Neenah Classic Crest 80lb Solar White
Ink: Altenew Crisp Die – Dew Drops, Aqualicious, Teal Cove, Soft Lilac, Lavender Fields, Midnight Violet, Deep Iris; Versamark Watermark Ink
Stamps: Altenew Vintage Roses; Alenew Extra Special
Die: Pretty Pink Posh Scallop Borders
Embossing Powder: Brutus Monroe Raven
Adhesives: Gina K Designs Adhesive Dot Runner; Glue Dots
Blending Brushes: Gina k Designs Blending Brushes
Embellishments: Offray Ribbon
Using Ink Blending Techniques to Add Details

Card Base
Beginning with a plain white piece of 80lb cardstock I use a fingertip dauber to add a reverse image of clouds using the color that was already on my dauber. If you are just starting out or don't have a dauber that already has ink on it you can just rub a new one into your ink pad and then use swirling motions on your media mat or a piece of paper towel before using it on your cardstock. This technique will give it a nice muted color. I used a dauber to create the sun also.
The focal point is created by using a layered stamp set with a faux watercolor technique. I paint the color onto each stamp with watercolor brushes, spray them with water, and then stamp onto watercolor paper, waiting for the ink to dry between each layer.
Focal Point
This stamp set comes with a coordinating die set so I use it to cut out each of the images.
Next, I arrange the pieces on the blended cardstock to determine where to put the sentiment and how wide the sides of the frame should be.
Frame
For the frame, I cut out a piece of white woodgrain patterned paper using an A2 size die and then used a smaller rectangle die to cut out the inside. I blend the paper using ink and a blending brush to accentuate the wood grain. Then I use a color that is slightly darker and blend the ink over all of the edges to give some dimension to the frame. When I'm done with the frame I attach it to the card base using double-sided foam tape.
Assembly
The last things to do then are to attach the images in the same arrangements I had determined earlier and stamp on a simple sentiment.
Supplies:
The following list may contain affiliate links. If you purchase something by following a link on this page, I may receive a small commission at no extra cost to you. Thank you for supporting my blog.
Cardstock: Card Panel – Neenah Classic Crest 110lb Solar White; Card Base – Canson XL Watercolor paper; Frame – Altenew White Wood Grain
Stamps and Dies: Altenew Winter Cardinal; Rubbernecker Stamp Winter Bouquet; Waffle Flower A2 Layers Die; Gina K Assorted Greetings
Embossing Folder: Sunny Studio Woodgrain
Inks: Frame Blending – Altenew Crisp Ink Espresso, Dark Chocolate, Milk Chocolate; Background Blending – Altenew Crisp Ink Caribbean Sky; Sentiment – Altenew Pigment Ink – Obsidian
Watercolor Pens: Zig Clean Color Real Brush
Sprayer: Distress Sprayer
Adhesives: Gina K Designs Adhesive Dot Runner; Scrapbook Foam Tape
Blending Brushes: Gina k Designs Blending Brushes
Handsome Greeting Card Using Emboss Resist and Ink Blending Techniques

Using heat embossing to resist blended ink creates a beautiful cityscape in this card.
I begin working on the card by stamping the image of the cityscape partway up from the bottom onto an A2 size piece of cardstock and then heat-emboss it with silver embossing powder. Then I blend over the embossing beginning with the lightest color, tumbled glass, first. Then I use blueprint sketch to create the water below the city and lastly, I use weathered wood to create the nighttime shadows. I fussy cut the city out once all the blending is complete.
I use another blending technique to create the galaxy/fireworks look in the sky. Beginning with crimson, warm sunshine, ocean waves, and midnight violet I blend the bright colors onto another white A2 card base. Then I blend jet black around and over the colors to provide the night lights after which I use white acrylic and metallic watercolors to sprinkle the stars and fireworks over the top.
I heat-emboss a sentiment from the same stamp set onto a scrap piece of paper and then add some dimension to the card by assembling it using double-sided foam tape.
Supplies:
The following list may contain affiliate links. If you purchase something by following a link on this page, I may receive a small commission at no extra cost to you. Thank you for supporting my blog.
Cardstock: Neenah Classic Crest 110lb Solar White: Canson Bristol Watercolor Paper
Stamp: Altenew Sketchy Cities America 2
Inks: Versamark Watermark Ink; Sky – Altenew Crisp Ink – Jet Black; Midnight Violet; Fresh Lemon; Ocean Waves; Crimson; Distress Oxide Black Soot; Cityscape – Distress Oxide Tumbled Glass; Blueprint Sketch; Weathered Wood; Altenew Crisp Ink Jet Black
Paints; Altenew Watercolor Essential Set; Altenew Metallic Watercolor; Darice Satin Acrylic Paint White
Blending Brushes: Gina k Designs Blending Brushes
Embossing Powder: Hero Arts Silver; Brutus Monroe Raven
Adhesive: Scrapbook Foam Tape
Shaker Card With Ink Blending Techniques

Shaker Card Base
This last card uses blending to not only pop its focal point but also provide a beautiful background behind the gold shaker confetti. The blending is done with Distress Oxide ink which results in a chalky appearance. I then take advantage of the inks' water-reactive characteristics by spritzing a little bit of water over the top and then dabbing with a paper towel.
Next, I create the shaker by cutting the center out of a piece of white woodgrain paper and attaching a piece of acrylic to the back with double-sided adhesive tape. Then I add foam tape around the edges of the backside of the frame I just created making sure that there won't be anywhere that the confetti can escape after which I add the confetti inside the tape and over the acrylic. Hint: if your confetti is staticy you can dab your embossing static tool over the acrylic to get rid of the static. We finish up the shaker part of the card by adhering the card that we blended.
Focal Point
The focal point is created by using a layered stamp set. I use the lightest ink color first and finish with the darkest. To provide a festive feel I use a glitter pen over the centers of the flowers and then add a couple of dots of glitter glue in the middle. I fancy-cut out the flowers, arrange them over the top of the shaker and then stick them down.
The last step is to heat-emboss the sentiment from the same stamp set onto a scrap of white cardstock and attach it using some foam tape.
Supplies
The following list may contain affiliate links. If you purchase something by following a link on this page, I may receive a small commission at no extra cost to you. Thank you for supporting my blog.
Cardstock: Card Base – Neenah Classic Crest 110lb Solar White; Card Panel – Canson Bristol; Stamped images -Neenah Classic Crest 80lb Solar White; Frame – Altenew White Wood Grain
Stamps: Altenew Holiday Bow; Scrappy Tails Candles & Poinsettias
Die: Waffle Flower A2 Layers Die
Ink: Altenew Crisp Ink – Rouge, Crimson, Honey Drizzle; Distress Oxide– Lucky Clover, Pine Needles; Versamark Watermark Ink
Adhesive: Bearly Art Glue, Gina K Designs Adhesive Dot Runner; Scrapbook Foam Tape
Blending Brushes: Gina k Designs Blending Brushes
Embellishments: Stickles Glitter Glue Goldenrod; Creatology Confetti Gold
Embossing Powder: Hero Arts Gold
What's Next?
Thank you for joining me on my exploration of ink blending!
Be on the lookout for my next post where I'll be sharing a number of masculine cards.


