

Learn how to make the beautiful Tropical Hi card with wax seals and stencils!
1. Create a Card Base For The Tropical Hi Card
To begin the card, we're going to create an A2 size (4 1/4″ x 5 1/2″) side-folding card base. For tips on how to make a card base, click HERE.
2. Stencil A Swirly Tropical Background
Next, you need to tape stencil #1 of the May 2024 Stencil of the Month to an A2 size piece of forest cardstock. After that, we're going to blend peeled paint Distress Oxide over the stencil. Afterward, we'll tape the second stencil layer to the cardstock. But, we're using pigment ink for this one, so we're going to use a different technique to add the ink. Add a domed foam pad to a mini blending tool and “pounce” it over the stencil openings. In other words, carefully dab the blending tool straight down and then pull it straight up.
Set the panel aside to dry.
3. Do The Die-cutting for the Tropical Hi Card
Next, we're going to create a soft backdrop for the wax seal with die-cuts. We're using several (3 of the large ones, 2 of the small one) of the two leaf sprigs from the Sealed Blooming Stems die set cut from a pearly cardstock that has a gold shimmer in it. I use Crafter's Companion Centura pearl white gold but you can use any white cardstock that you have. And then spray it with a shimmer spray.
4. Create The Wax Seal
To create the star attraction, the wax seal, you'll need a wax seal starter kit, a Tropical Hi wax seal stamp, and matcha wax beads.
Light the candle and then lower the furnace down over it. While the furnace is heating up set the spoon on top and add 5 wax beads to it. Swirl the wax until it is completely melted. You can do this by moving the spoon with your hand, but I like to use the wood match that I used to light the furnace with.
Quality Techniques
Once the wax is melted thoroughly, lift the spoon off of the furnace and pour the wax in a pool onto the silicone mat. Lightly lower a wax seal stamp down onto the wax using it's weight to make the impression in the wax. Let cool.
Once the wax has cooled, carefully remove the wax seal stamp from the wax. If the wax sticks on the stamp you can use your hands to remove it.
Wax seals are beautiful on their own, however coloring the impressions adds an extra punch to them. You can do so with a gold metallic marker. Once the marker is dry you can attach the seal with an adhesive circle.
5. Assemble The Tropical Hi Card
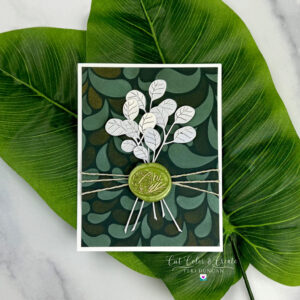
To finish the card, we'll start by trimming the background to 4″ x 5 1/4″. Following that, we'll arrange the sprigs in a pretty bouquet where the stems will cross over each other at about a third from the bottom. You can use small foam squares to give the bouquet some dimension and liquid glue to fasten the arrangement to the card panel.
Next, wrap some baker's twine around the card panel three times over where the stems cross. To coordinate with the gold shimmer on the background and in the sprigs and the gold on the seal, I choose twine that has a gold thread in it that i found online. It is helpful to use best ever craft tape to hold the twine in place both on the front and on the back.
Make Sure It Sticks
Because of the dimension created by the twine, let's use a 3 3/4″ x 5″ piece of white liner sheet to attach the panel to the card base. As a result, the panel will stay fastened securely to the card panel. And finally, we can add the wax seal by attaching an adhesive circle to the back and place it on top of where the sprigs and twine meet.
And, that's all there is to this lovely serene tropical hi card.
There are affiliate links in this article. If you use one I may receive a small commission at no extra cost to you. Thank you for your support!

Matcha Wax Beads
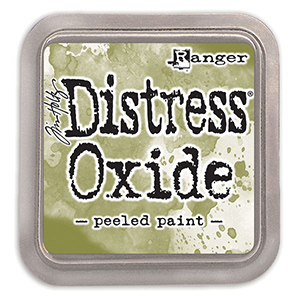
Peeled Paint Distress Oxide Ink

Gold Metallic Marker

Mini Ink Blending Tool

Mini Ink Blending Tool Domed Blending Foam

White Liner Sheet
Best Ever Craft Tape - 5/8" - Spellbinders

Antique Gold Pigment Ink - Altenew

Forest Cardstock

Wax Seal Of The Month

Adhesive Circles

Wax Seal Starter Kit - Spellbinders
Glue Press
Bearly Art Glue

Stencil of the Month
110lb Solar White
Platinum 6 Die-cutting Machine

Spellbinders Large Blending Brushes
Matcha Wax Beads
Peeled Paint Distress Oxide Ink
Gold Metallic Marker
Mini Ink Blending Tool
Mini Ink Blending Tool Domed Blending Foam
White Liner Sheet
Best Ever Craft Tape - 5/8" - Spellbinders
Antique Gold Pigment Ink - Altenew
Forest Cardstock
Wax Seal Of The Month
Adhesive Circles
Wax Seal Starter Kit - Spellbinders
Glue Press
Bearly Art Glue
Stencil of the Month
110lb Solar White
Platinum 6 Die-cutting Machine
Spellbinders Large Blending Brushes
The Tropical Hi card celebrates the new Wax Seal of the Month for May 2024 at @Spellbinders. Check out the article where I introduce several of the new club kits.