
A Crafters Traveler’s Notebook is the perfect solution for keeping your crafty goodness all in one place! Read on to learn how to make one.
Traveler’s notebooks consist of a cover, inserts with pages in them, and elastic to hold the inserts in place. You can use the inserts for different topics and can interchange or rearrange them whenever you want.
And that is the beauty of the traveler’s notebook. You can use new inserts for new projects and/or keep notes on new techniques and supplies. And you can store inserts in a way that you can use them later. Of course, when you’ve filled one up you can remove it, file it, and replace it with a new one.
Select a Traveler’s Notebook Size
The first thing to consider when making a traveler’s notebook is its size. Inserts come in a myriad of sizes to select from.
Traveler’s Notebook Insert Sizes

Things to consider when determining what the size of your traveler’s notebooks should be:
- What you plan to do with the notebook. For example if you’re going to catalog your supplies in it you’ll probably need a larger size.
- How or where you plan to carry your notebook. Because if you want to carry it in your purse or a crafters bag you might need something smaller.
We’ll be using a scrap of leather that we’ve found in our crafty stash for the cover. And we’ll play with an embossing technique on it. We don’t want to see seams in the pattern, so the size of the embossing folder will dictate the size we’ll choose for our notebook.
The embossing folder that we’re using is 6″ x 6″. So we’ll go with A6 inserts because they are 4.1″ x 5.8″ and the embossed design will fit perfectly over them. However, you can see in the photo that this author prefers Carpe Diem Cahier or Standard Wide (especially if you’re going to catalog your crafty stash.
Make a Crafters Traveler’s Notebook Cover
There are all kinds of suppliers that make covers for traveler’s notebooks but it only seems right for us to make one ourselves for our Crafters Traveler’s Notebook.
Traveler’s Notebook Cover Material
As mentioned earlier, we are upcycling a leather scrap to use for our cover. The leather is soft and pliable and similar to what you might find used for making clothing.
Hint: If you don’t have any leather in your stash, try Cricut Genuine Leather because it’s easy to find and it’s perfect for what we’re using it. You can find it here: Cricut Leather or check the big box stores for it.
Cutting the Cover
Now we’ll cut the leather. We’re using a Cricut Maker to make the cuts using our design for our cover. As a result, the cuts are clean and accurate.
Hint: You can cut the leather using an Exact-O knife and a punch for the holes if you don’t have a Cricut machine.
Notebook Design

Embossing the Cover
Once the leather is cut, we need to emboss it. And, we want to add some color to the design. So, we’ll add some ink to the inside of the embossing folder.
Cutting Cover
Before we start working on our cover, we’re going to test our ideas on some of the excess leather from cutting out our cover. It’s a good thing we do because the first die-cutting machine we try, a Spellbinders Platinum 6, didn’t work. Additionally, the colors aren’t as bright as we would like for them to be.

Adding Die to Embossing Folder
Alcohol Marker Coloring
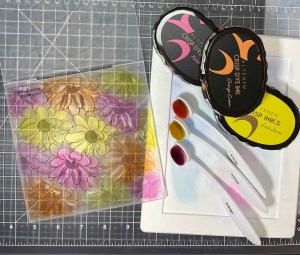
Next, we’ll test alcohol markers on our embossed test swatch to see if the results are better than they were with the ink on the embossing folder. As a result, our flowers are fantastic! Additionally, we can add detail and blending to the colors to really make them pop. These are techniques learned in Altenew’s Beautiful Details Online Class.

You can see the difference in the photo on the right. The yellow daisy under the “d” is done with markers and the rest were from embossing the ink. We’ll choose the alcohol markers because they’re so much more vibrant and allow us to add detailing.
Now that we’re happy with our testing we’ll go ahead and emboss the front of the cover. And then we’ll use the markers to color and blend some of the daisies in the design.
Heat Embossing the Sentiment
We’re going to use a fun stamp to add a sentiment to our cover. I dream about the projects that I’m working on or want to create. And, when I’m not sleeping I’m daydreaming about them! So, using “dream” for the sentiment on our cover is perfect for this crafter.
Our initial plan was to heat emboss on a separate piece of leather as is shown in the test scrap photo above. And then we are going to glue it to the cover.
However, we test embossing directly over the colored, embossed flowers and we like the results. So, just like we do with cardstock we’ll brush the cover with anti-stick powder. And then we’ll stamp the sentiment onto our cover using watermark ink.
Cover Hints:
- Use a large format die cut machine like the Spellbinders Platinum for embossing leather.
- Alchohol Markers produce vibrant colors that are permanent, dry quickly and can be blended.
- If the embossing powder sticks to the coloring on the flowers the marker ink isn’t dry enough. Wait until it is dry and try again.
- Add several layers of embossing to the sentiment to produce a smooth dimensional image.
- If you don’t have a Cricut and you’re using a lightweight leather then you can cut the leather with an exacto knife and make the holes with a punch.
Cover Reinforcement
This leather is pretty flimsy on its own so we’ll reinforce both the front and back of the cover. We’ll do this by trimming a couple of pieces of paper to 3 3/4″ x 5 1/2″. Using our corner chomper, we’ll trim each of the corners to 1/4″. And then we’ll center them on the inside using craft glue.
Next, we’ll add a little pocket on the inside front cover. We’ll do so by trimming a piece of paper to 2″ x 3 1/4″, chomping the two bottom corners. And then add 1/4″ double-sided tape to the sides and bottom of the backside of the pocket and then attach it centered at the bottom of the reinforcement.
Cover Reinforcement & Pocket

Inspiration for making the cover comes from the following online classes from Altenew:
-
- Magical Marker Techniques Online Class where we learned to use markers on unique materials
-
- Beautiful Details Online Class where we learned that adding a little detail to an image really improves the quality of the detail.
-
- Color Your Day Online Class where we learned how to blend with markers.
-
- Impressive Heat Embossing Online Class where we learned to layer embossing to give a nice sooth dimensional image
Crafters Traveler’s Notebook Cover Supplies
-
- Leather: Cricut Genuine Leather
-
- Cutting Machine: Cricut Maker 3
-
- Embossing Folder: Altenew Daisy Bed 3D
-
- Punch: Crafters Tool Kit
-
- Patterned paper: Vicki Boutin Gallery; Vicki Boutin Pretty Things
-
- Corner Chomper: We R Memories
-
- Alchohol Markers: Altenew – Volcano Lake, Mountain Mist, Emerald, Lagoon, Midnight Violet, Deep Iris, Lavender Fields, Soft Lilac, Sunkissed, Orange Cream, Autumn Blaze, Firebrick, Frosty Pink, Coral Berry, Ruby Red, Mango Smoothie, Dark Chocolate, Grapevine, Pure Graphite
-
- Stamp: Photoplay Say it with Stamps Dream
Crafters Traveler’s Notebook Inserts
Inserts are available from many suppliers. We’ll buy A6 inserts for our notebook.
Insert Slipcovers
To make the inserts more interesting and attractive we’ll create insert slipcovers.
To create a slipcover we’ll select the patterned paper that we want to use and then trim it to 5 1/2″ high by 10″ wide. Then we’ll score the paper at 5″ from one side. And then we’ll fold the paper at the score. Next we’ll slip an insert inside the paper and push it back until the ‘spine” of the insert is snug against our scoreline.
Next, we’ll open the front cover holding the slipcover to the insert cover, and fold the paper down at the right edge of the insert cover. And then we’ll attach the slipcover to the insert with a piece of washi tape. We’ll do the back cover the exact same way.
All that is left for the slipcovers is to add is a title for the notebook and some decoration (if desired).
Inspiration for the inserts comes from the following Altenew Online classes:
- Big Projects
- Doodling
- Memory Keeping
- Collecting Inspirational Quotes
- Habit Tracking and Reinforcing
- Daily Journal
- Planning
- Travel
- Bullet Journaling
- Gratitude Journaling
- Art Journaling
- Notes
- Expense Tracking
- Appointment Book
- Note
- Wallet
- Cataloguing
- Positivity Tracking
- Daily To Do Lists
-
- All About Layering Online Classes that cover using layered stamps and how to perfect our technique.
-
- Magical Marker Techniques Online Class and Celebration Stencil Techniques Online Classes that teach us to think outside of the box when using stencils.
- Incredible Ink Blending Techniques Online Class (no longer available) covers how to use do beautiful ink blending
Project Ideas Insert

Crafty Sales by the Month Insert

Crafty Events Insert

Crafty Lists Insert

Crafters Traveler’s Notebook Insert Supplies
Lists Insert
- A6 Traveler’s Notebook Insert
- Paper: slipcover – scrap; panel – Paige Evans Pick-Me-Up Paper Pad
- Ephemera: Jen Hadfield Peaceful Heart
- Stickers: Jen Hadfield Peaceful Heart
- Journaling Pen: Copic Multiline 0.1
- Alchohol Marker: Altenew Grapevine
- Adhesive: Gina K Designs Adhesive Dot Runner.
Ideas Insert
- A6 Traveler’s Notebook Insert
- Patterned Paper: Vicki Boutin – Color Study Collection – 12 x 12 Double Sided Paper – Pretty Things
- Die: Gina K & Therm-O-Web Decorative Label
- Glitter Pen: Kaiser Gel Pen
- Journaling Pen: Copic Multiline 0.1
- Stickers: Vicki Boutin Color Study
- Adhesive: Gina K Designs Adhesive Dot Runner.
Sales Insert
- A6 Traveler’s Notebook Insert
- Patterned Paper: Vicki Boutin – Color Study Collection – 12 x 12 Double Sided Paper – Journal
- Die: Altenew Apothecary Labels Die
- Glitter Pen: Kaiser Gel Pen
- Journaling Pen: Copic Multiline 0.1
- Adhesive: Gina K Designs Adhesive Dot Runner.
Events Insert
- A6 Traveler’s Notebook Insert
- Printed Paper: Simple Stories Simple Vintage Country Harvest #16311 Journal Elements
- Die: Altenew Apothecary Labels Die
- Alchohol Marker: Altenew Autumn Blaze
- Journaling Pen: Copic Multiline 0.1
- Adhesive: Gina K Designs Adhesive Dot Runner.
Crafters Traveler’s Notebook Tip Sheets
Planned Card Tip Sheet

Event Considerations Tip Sheet

Bucket List Tip Sheet

We’ll make four tip sheets for our notebook. Hint: tip sheet is a fancy name for a divider.
To make the tip sheets we’ll stamp the spring daisies outlines on white cardstock first. Then we’ll stamp the second stamp layers of the daisies in different colors. We’ll add several daisies to each tip sheet to create a pretty design making sure to leave some room to add a title for what will be in the following section.
On the other side of the tip sheets, we’ll use a stripe stencil. And, we’ll ink blend in a rainbow to give the tip sheet some color. As a result, the stripes become lines that we can use to create lists. And now we’ll use a stitched die to trim the tip sheet to the perfect size.

We use fancy label dies with white cardstock to add titles for our lists. And, we use the labels so that the titles will stand out over the colored stripes. Then, we’ll attach them at the top of the tip sheets with an adhesive dot runner.
Finally, we add the finished tip sheet to the insert with washi tape on both sides.
Crafters Traveler’s Notebook Tip Sheet Supplies
- Cardstock: Neenah Classic Crest 80lb Solar White
- Stamp: Altenew Spring Daisy
- Stencil: Classy Stripes
- Die: Altenew Apothecary Labels; Gina K & Therm-O-Web Decorative Label; Lawn Fawn Small Stitched Rectangles
- Ink: For stamped daisies – Altenew Crisp Inks: Fresh Lemon, Jet Black , Cloudy Night, Bamboo, Orange Cream, Milk Chocolate, Dark Choclolate, Maple Yellow, Tidal Blue, Midnight Violet, Rubellite, Aquamarine For rainbow stenciled lists – Altenew Crisp Inks: Flowers – Fresh Lemon, Jet Black , Cloudy Night, Bamboo, Orange Cream, Milk Chocolate, Dark Choclolate, Maple Yellow, Tidal Blue, Midnight Violet, Rubellite, Aquamarine – Rainbow – Midnight Violet, Ocean Waves, Bamboo, Sunshine, Autumn Blaze, Crimson, Purple Wine
- Adhesive: Gina K Designs Adhesive Dot Runner
- Washi Tape: Altenew
Final Assembly of Our Crafters Traveler’s Notebook

Elastic
As mentioned earlier, elastic is used to hold the inserts to the cover. For our notebook, we’re going to cut a piece 30″ long (four times the height of our notebook and 4 times the width of the spine and then add four inches. And we want to make sure we have enough, so we’ll round up to the next number that ends in zero).
Beginning on the inside we’ll poke the elastic through the hole at the top right of the spine. Then we’ll bring it back to the inside through the from inside on the top left. Next, we’ll thread it through the bottom left hole and then back through from the outside on the bottom right.
Then we’ll repeat threading the elastic through all of the holes one more time and then tie both ends together in a knot.
Hint: Try the inserts on the elastic before you tighten the knot.
Elastic To Hold the Notebook Shut
Cut one more piece of elastic 11″ (two times the distance to the center hole and then round up. Now thread both ends of the elastic through the cover from the outside. Tray out the elastic in a closed position. It should be snug but loose enough to be able to get it up and over the side of the notebook. Then tie a knot with the two ends on the inside of the notebook.
Place Holders
I don’t know about you, but I have trouble keeping track of where things are in a notebook. So, to alleviate this problem we’re going to add ribbons as you find in a Bible to our notebook. And, this idea comes from David Lee Brown at SA Tabernacle (#DavidLeeBrown).
We’re going to use grosgrain ribbon because it is stronger than satin ribbon. And we’ll begin by cutting two pieces about 20″ long.
Holding the two pieces of ribbon together we’ll begin poking a corner through one of the holes on the top of the inside of the cover. Once we get hold of it we’ll pull them until they are about halfway through.
Then we’ll poke them through the other hole on the top from the outside and pull them until the ribbon catches. Next we’ll adjust to make sure each end of the ribbon is close to being the same length. And then we trim each end with a diagonal cut. And finally, we’ll slip each of the inserts onto the elastic.
Supplies
- Elastic: Metallic Gold Elastic
- Ribbon: Joann Place & Time Fall Ribbon 3/8″
Crafters Traveler’s Notebook Summary
We’ve used a common theme with daisies and autumn colors throughout the notebook. However, this can be changed up by creating new slipcovers with different colors and designs.
As you can see it’s easy to get carried away. But these Crafters Traveler’s Notebooks are so great to use and fun to make!
There you have it. This is a super fun project that is so awesome! And, we hope that you enjoy using your Crafters Traveler’s Notebook as much as we do! Have fun!
This project is created as Part B of the Altenew Educator Certification Program Level 2 Final Assignment. And, the assignment is to create an altered/upcycled item using the techniques that we have learned in Level 1 and Level 2.
Part A is to create four masculine cards with the following themes: birthday, love, encouragement, and anniversary. You can check it out here: How to make 4 Fantastic Masculine Cards.
How to make 4 Fantastic Masculine Cards
Travelers Notebooks Inspiration
I recently attended the #CropandCreateDeliveredPapercrafting event that Scrapbook and Cards put on. One of the classes was The Wonderful World of Traveler’s Notebooks taught by #Layle Koncar….and now I am hooked!
Appendix: Ideas for Inserts for Crafters Traveler’s Notebooks
- Big Projects
- Doodling
- Memory Keeping
- Collecting Inspirational Quotes
- Habit Tracking and Reinforcing
- Daily Journal
- Planning
- Travel
- Bullet Journaling
- Gratitude Journaling
- Art Journaling
- Notes
- Expense Tracking
- Appointment Book
- Note
- Wallet
- Cataloguing
- Positivity Tracking
- Daily To Do Lists
This is really cool and super artsy, Teri!! You will have so much fun filling this in! You can keep on inserting pages as you go! So very cool! Thank you for sharing this wonderful project with us! So delighted to see this.
Thank you for you submission.