

Winter Wonderland, the new release from @Ranger-Ink and @Spellbinders features designs from @SimonHurley. And, it's magical! Let me show you how I made these two fantastic cards with it.
But first, I want to share something really exciting about this release. There are dies to go with the stamps!
Winter Wonderland Reindeer Card

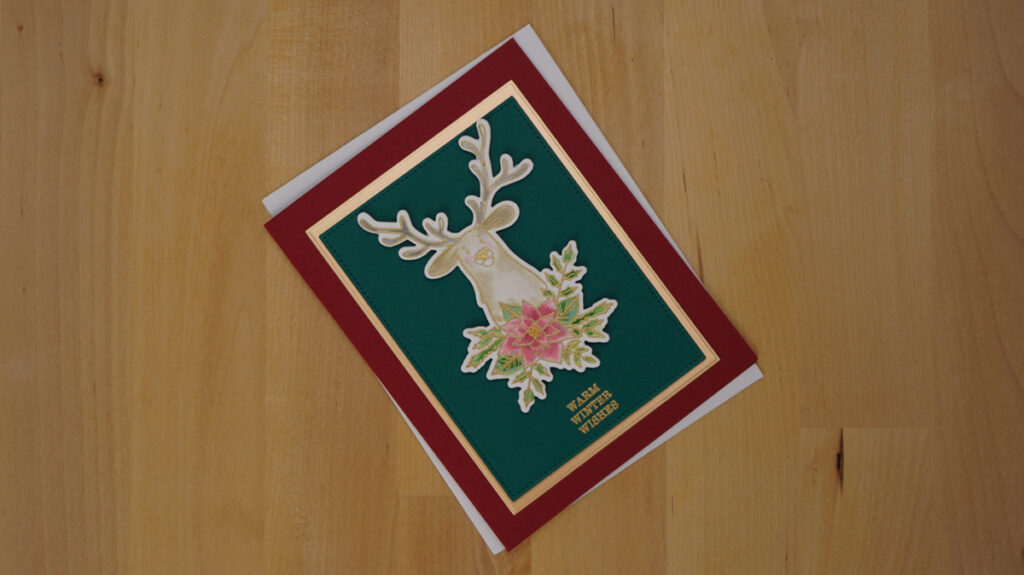
Believe it or not, this card is super quick and easy. To demonstrate, we'll begin by heat embossing the reindeer stamp from the new release with gold embossing powder.
Watercoloring With Ink Pads
We're using our ink pads to watercolor with. Therefore we'll prepare to paint by smooshing a tiny bit of each of the colors onto our media mat, glass work surface, or anything that is non-porous.
If you've ever watched one of Simon Hurley's (@Inklipse) videos or attended one of his classes, you'll know that he recommends brushing a coat of water onto the area that you want to paint before you start to watercolor. You do this because the water helps to move the color, if you don't the color just sinks into the paper.
Hint: Simon's cardstock is the bomb for this technique!
We'll start by adding the water wash to the reindeer. And then with a small paintbrush, we'll mix a little water with the brown ink, Woof!,. And then we'll begin to add color to the places on the reindeer where there would be shadows. For example, along the edges on both sides, his ears, and under his chin. Then we'll add more water to our brush and then draw the color out.
We'll do the same thing with the antlers using gray ink. And, the poinsettias and leaves using reds and greens. Don't forget to add a little pink to his cheeks.
Finishing The Card
We'll use the coordinating die to cut out our reindeer which perfectly outlines our image. Next, cut our red card panel to A2 size (4 1/4″ x 5 1/2″). And, we'll attach it to an A2 card base with a glue runner. Next, we'll trim our mirror cardstock to 3 1/2″ x 4 3/4″ and center it with the glue runner.
Next, we'll trim our green color accent panel to 3 1/4″ x 4 3/8″ (I use a rectangle die with stitching). We'll heat emboss the greeting centered along the bottom with gold embossing powder. And we'll pop it up with foam tape centered on the mirror cardstock.
And finally, we'll pop up the reindeer centered over the greeting.
Supplies for Winter Wonderland Reindeer Card
The following list may contain affiliate links. If you purchase something by following a link on this page, I may receive a small commission at no extra cost to you. Thank you for supporting my blog.
- Cardstock: Card base – Neenah Classic Crest 110lb Solar White; Card panel – Spellbinders Phone Booth; Mirror panel – Tonic Studios Majestic Gold Pearlescent; Color panel – XXX; Stamping panel – Simon Hurley Stark White
- Stamp and Die Bundle: Winter Wonderland by Simon Hurley Create
- Stitched Rectangle Die: Gina k Designs Master Layouts 5
- Stamping Platform: My Sweet Petunia Mini Misti
- Embossing Powder: Spellbinders Gold
- Heat Tool: Sizzix Dual Speed – On Sale at the time of publishing!
- Ink: Watermark – Spellbinders; Simon Hurley Dye Ink – Rosey Cheeks, Midnight Snack, No Diving, Grrr!, Woof!, Shady
- Media Mat: Waffle Flower Water Media Mat or Tim Holtz Glass Media Mat
- Paint Brush: Silver Black Velvet Round #0
- Adhesive: Easy Glide Permanent Adhesive Runner
Winter Wonderland Polar Bear Card


I fell in love with the Winter Wonderland set because of these cute little bears.
To create this fun card we'll begin with the background. With a very light hand, we'll blend brown ink on the upper third of an A2 piece of smooth white cardstock. We do this because we're creating a night scene and we want to show shadows on the birch trees and the snow.
Next, we'll attach the stencil over our panel and blend beginning with the lightest blue over the sky. Then, we'll blend in some purple across the top and down the sides. Now, we'll blend in the dark blue over all the snow, just above the horizon, and over the trees (with a small blending brush).
We'll set that aside to dry while we create our cute little bears.
Winter Wonderland Polar Bears
We'll heat emboss the bears with black embossing powder on smooth white cardstock. Once they are cool, we'll paint the bears. This is very simple because the bears are white, all we have to do is add some light shadows with gray ink…and of course, we have to give pink cheeks to the baby.
Once the paint is dry we will cut out the bears using the coordinating die set.
Finishing the Winter Wonderland Polar Bear Card
First, we'll assemble the card by attaching the background to the card base with a glue runner. And then, we'll pop up the bears with foam tape.
To finish the card we'll add some snow. To demonstrate how we do this, we'll spray over the card with shimmer spray. And then we'll splatter some white metallic watercolor over the top.
And that's it.
Supplies
The following list may contain affiliate links. If you purchase something by following a link on this page, I may receive a small commission at no extra cost to you. Thank you for supporting my blog.
- Cardstock: Card base – Neenah Classic Crest 110lb Solar White; Stamping panel – Simon Hurley Stark White
- Stamp & Die Bundle: Winter Wonderland by Simon Hurley Create
- Stamping Platform: My Sweet Petunia Mini Misti
- Embossing Powder: Spellbinders Black
- Heat Tool: Sizzix Dual Speed – On Sale at the time of publishing!
- Ink: Watermark – Spellbinders; Simon Hurley Dye Ink – Crown Me, Midnight Snack, No Diving, Grrr!, Woof!
- Stencil: Hero Arts Birch Trees
- Adhesive: Easy Glide Permanent Adhesive Runner
- Shimmer Spray: Hero Arts Iridescent
- Metallic Watercolor Paints: Altenew
In Case You Missed It…
…there were some really cute things in Spellbinders' September release. You can check it out here HAVE YOU SEEN THE NEW NORDIC SPELLBINDERS RELEASE?